Over the next few articles, I will write about OpenFlow, Open vSwitch and other SDN related topics. As always, I'm combining the theory part with some hands-on practice and for this, I put this article together describing one way of building such a testing environment.
In the subsequent SDN articles, I want to focus on the topic being discussed and not on how to build the lab and this is the reason of writing this post.
Among other things, SDN means flexibility - as such, there are multiple ways of creating your own SDN lab, some more simpler than others, depending on your skills. At the heart of an SDN testbed is virtualization - you virtualize almost everything: hosts, network links, switches, routers, etc... Most of the virtualization techniques are based on linux - for example: isolation using namespaces (especially network namespaces), linux bridging, virtual ethernet pairs (veth), OS-level virtualization vs. lightweight containers - all these are topics that will help you get the full picture. I won't spend time explaining them since there are plenty of resources out there on the big wide web.
Again, I want to emphasize that this is just an example of a lab, just one way of testing ! There are many other ways to achieve the same things - using LXC, QEMU, KVM, just to name a few. I'm not going to reason why I use this instead of something else - it all comes down to your personal preference.
If you already have your favorite virtual environment and you are interested only in the OVS testbed, then please jump directly to Open vSwitch Setup section.
Components
Here is a list of the components used to build the lab environment:
VirtualBox - used to create different virtual machinesVagrant - used to manage the VMs in a fast and reproducible fashion (thus making sure that everyone uses the same environment, avoiding troubleshooting VirtualBox issues and focusing entirely on the topic being tested)- Network Namespaces - used to isolate (or partition) the network interfaces (and, as a result, the routing table, more like VRFs do). We are going to use them to simulate testing hosts.
- veth pairs - Virtual Ethernet interfaces that are used to connect the virtual elements (hosts, software switches) between them. VETH always come in pairs - think of them as being same as a pipe: whatever comes in one end will go out the other.
- X11 server - used for X forwarding. Depending on your OS, you may want to install Xming (if you're on Windows) or XQuartz (if you're on MacOS)
Please follow the links above to install VirtualBox and Vagrant.
Setup
VirtualBox
Once you have downloaded and installed VirtualBox, let's create a couple of Host-Only network adapters. To do so, open
vboxnet0- IPv4 address: 192.168.56.1/24vboxnet1- IPv4 address: 192.168.57.1/24
Vagrant
We are going to use Vagrant in order to manage the VirtualBox VMs. The Operating System of the VMs will be the latest LTS version of Ubuntu (currently, Xenial - 16.04) - this is how we tell vagrant to add such a box to its inventory:
vagrant box add ubuntu/xenial64.
Personally I keep all my vagrant boxes in a folder called vagrantwork: mkdir -p ~/vagrantwork.
After this point, the workflow is pretty standard -
-
create a new directory for each VM (I call them box1, box2, ...):
mkdir -p ~/vagrantwork/box1 -
create an init vagrant file inside that directory:
In case you create multiple VMs, I highlighted what you need to change - for example, a second VM, stored in its owncd ~/vagrantwork/box1 cat >Vagrantfile <<EOF Vagrant.configure(2) do |config| config.vm.box = "ubuntu/xenial64" config.vm.box_check_update = false config.vm.network "private_network", ip: "192.168.56.
11 " config.vm.network "private_network", ip: "192.168.57.11 " config.vm.provider "virtualbox" do |vb| vb.name = "vagrant_box1 " end config.ssh.forward_x11 = true end EOF~/vagrantwork/box2folder, will get IP addresses 192.168.56.12 & 192.168.57.12 and the namevagrant_box2. -
bring up your box (make sure you are in the right folder):
cd ~/vagrantwork/box1
vagrant up -
That's it! Now connect to your VM:
cd ~/vagrantwork/box1
vagrant ssh -
(extra) do an
sudo apt-get update; sudo apt-get upgrade -
(extra) set a miningful hostname - for example set name "
box-1 " in the/etc/hostnameand/etc/hostsfiles.
Read more about Vagrant on their documentation page. Some other very useful vagrant commands:
vagrant status= displays the state of the machinevagrant box list= lists all boxes installed into Vagrantvagrant snapshot [ save | list | delete ]= manage snapshotsvagrant [ suspend | resume ]= suspends (and resume) the guest machine rather than fully shutting it downvagrant destroy= destroy the machine
Open vSwitch Setup
Here you also have the option of going the easy way by installing Mininet and everything that comes with it (I recommend installing from sources) -
git clone git://github.com/mininet/mininet cd mininet util/install.sh -nfv# use '-h' (help) to understand what you are installing
Or, another simple option is to install the Ubuntu packages ( sudo apt-get install openvswitch-switch openvswitch-common
But, if you want to have an identical setup with mine (in case you want to recreate the labs that I'm going to present in future posts), then,
Install Latest Kernel
Lately, my tests required me to compile the kernel from sources and although the process is not as painful as it once (read 10 year ago) was, it was still time consuming and error prone. I found that installing the kernel using .deb packages from the
# Navigate to http://kernel.ubuntu.com/~kernel-ppa/mainline/ # scroll down to the very bottom (where the latest kernel version is) # then download these 3 .deb files: # linux-headers-...- wget http://kernel.ubuntu.com/~kernel-ppa/mainline/v4.7-rc6-yakkety/linux-headers-4.7.0-040700rc6-generic_4.7.0-040700rc6.201607040332_amd64.deb wget http://kernel.ubuntu.com/~kernel-ppa/mainline/v4.7-rc6-yakkety/linux-headers-4.7.0-040700rc6_4.7.0-040700rc6.201607040332_all.deb wget http://kernel.ubuntu.com/~kernel-ppa/mainline/v4.7-rc6-yakkety/linux-image-4.7.0-040700rc6-generic_4.7.0-040700rc6.201607040332_amd64.deb.deb # linux-headers-...-all.deb # linux-image-...- .deb # then install them and reboot sudo dpkg -i *.deb sudo reboot
Install Latest Open vSwitch
Now I install Open vSwitch by building the Debian packages from the latest version (master) Git tree:
# Get the latest version (master) mkdir -p ~/ovs-master; cd ~/ovs-master git clone https://github.com/openvswitch/ovs.git cd ovs# Install necessary packages for the build # use command 'dpkg-checkbuilddeps' to find the list of packages that you need to install sudo apt-get install build-essential fakeroot sudo apt-get install pkg-config graphviz autoconf automake debhelper dh-autoreconf libssl-dev libtool python-all python-qt4 python-twisted-conch python-zopeinterface# Now build the packages # Start this process only after the command 'dpkg-checkbuilddeps' returns nothing missing # This steps takes about 15 min DEB_BUILD_OPTIONS='parallel=8' fakeroot debian/rules binary# Now install the packages # but before that some required packages first sudo apt-get install ipsec-tools racoon cd ..sudo dpkg -i openvswitch-common*.deb openvswitch-switch*.deb openvswitch-ipsec*.deb openvswitch-pki*.deb python-openvswitch*.deb openvswitch-testcontroller*.deb
Let's test that everything is ok (of course, your version may be higher than the one displayed below, since you are installing the latest stuff):
ubuntu@box-1 ~$sudo ovs-vsctl show cae0df42-9c95-4af0-a4b9-f10386ed7beeovs_version: "2.5.90"
Leveraging Linux to Create an SDN Testbed
Again, using Mininet is, for sure, the easy option to create a testbed. Run sudo mn and you'll get the default OVS switch with two hosts connected to it.
Instead, I will manually create each element - thus learning some new stuff that will help later on ! Below is the diagram showing the target that we want to reach: 2 hosts connected via veth pairs to an OVS switch.
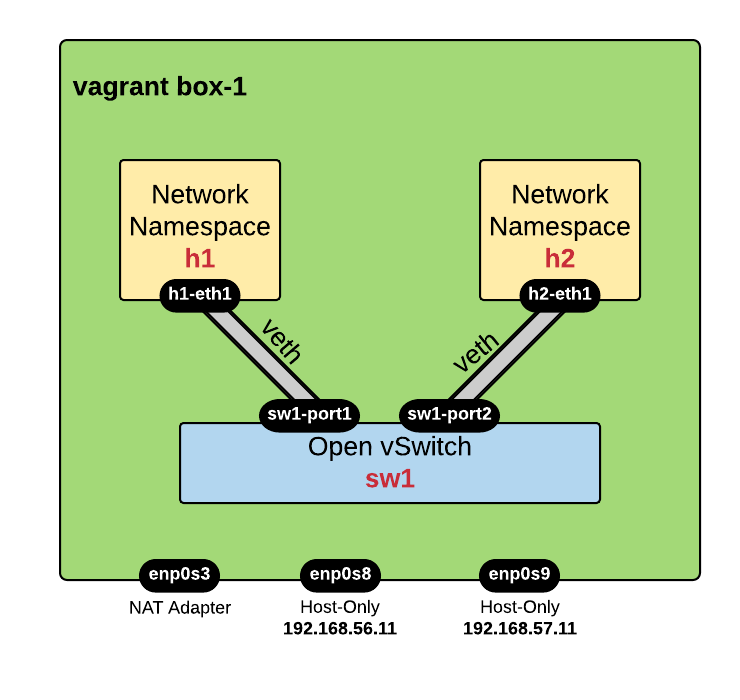
Creating Hosts using Network Namespaces
We will use network namespaces in order to simulate hosts:
sudo ip netns addh1 sudo ip netns addh2
Creating an OVS Switch
Let's create a virtual OVS switch named sw1:
sudo ovs-vsctl add-brsw1
Creating Network Connectivity using veth pairs
We will need to create veth links in order to achieve network connectivity:
sudo ip link add nameh1-eth1 type veth peer namesw1-port1 sudo ip link add nameh2-eth1 type veth peer namesw1-port2
Now we will connect each host to the switch using the veth pairs created above. One end of the veth pair (hX-eth1) will be attached to the network namespace while the other end (sw1-portX) will be added to the switch.
# for h1: sudo ip link set dev h1-eth1 netns h1 sudo ovs-vsctl add-port sw1 sw1-port1# for h2: sudo ip link set dev h2-eth1 netns h2 sudo ovs-vsctl add-port sw1 sw1-port2
Configure IP addresses and Bring Interfaces Up
By default all these veth interfaces are in DOWN state and un-configured. Since one end is assigned to the network namespace, all the configuration commands need to be executed inside the namespace with command sudo ip netns exec <host> <command>.
Let's see:
# for h1: sudo ip netns exec h1 ifconfig h1-eth1 10.0.0.1/24 up# for h2: sudo ip netns exec h2 ifconfig h2-eth1 10.0.0.2/24 up
The other end of the veth pair, that is connected to the virtual switch, just needs to be brought up - using standard linux commands:
sudo ip link set sw1-port1 up
sudo ip link set sw1-port2 up
Test Connectivity between hosts
At this moment you should have a working lab environment with connectivity between h1 (
ubuntu@box-1 ~$sudo ip netns exec h1 ping 10.0.0.2 PING 10.0.0.2 (10.0.0.2) 56(84) bytes of data. 64 bytes from 10.0.0.2: icmp_seq=1 ttl=64 time=0.334 ms 64 bytes from 10.0.0.2: icmp_seq=2 ttl=64 time=0.059 ms ^C --- 10.0.0.2 ping statistics --- 2 packets transmitted, 2 received,0% packet loss , time 999ms rtt min/avg/max/mdev = 0.059/0.196/0.334/0.138 ms ubuntu@box-1 ~$
You may ask
The answer is: the default behaviour of the OVS switch is that of a traditional layer 2 switch. You can see this by inspecting the flow table with ovs-ofctl dump-flows command:
ubuntu@box-1 ~$sudo ovs-ofctl dump-flows sw1 NXST_FLOW reply (xid=0x4): cookie=0x0, duration=1818.260s, table=0, n_packets=44, n_bytes=3704, idle_age=4, priority=0actions=NORMAL
By default, there is this single flow that has no match fields (so basically it matches everything) and action = NORMAL which means that it uses the traditional non-OpenFlow Layer 2 switching.
Troubleshooting
If you have got this far but for some reason the two hosts cannot ping each other, you can follow these trobleshooting steps to check what's wrong:
|
NOTE
|
The terms bridge and switch define the same thing and are used interchangeably ! |
-
check the status of the OVS bridge (that it contains the correct ports)
ubuntu@box-1 ~$ sudo ovs-vsctl show 99804df1-b2f3-4e33-b1a4-59a7c6f260db Bridge "sw1"Port "sw1-port2" Interface "sw1-port2" Port "sw1-port1" Interface "sw1-port1" Port "sw1" Interface "sw1" type: internal ovs_version: "2.5.0" -
check that interfaces are UP on the switch:
You don't have to worry about the LOCAL(sw1) port showing as DOWN.ubuntu@box-1 ~$ sudo ovs-ofctl show sw1 OFPT_FEATURES_REPLY (xid=0x2): dpid:0000f66282ccb549 n_tables:254, n_buffers:256 capabilities: FLOW_STATS TABLE_STATS PORT_STATS QUEUE_STATS ARP_MATCH_IP actions: output enqueue set_vlan_vid set_vlan_pcp strip_vlan mod_dl_src mod_dl_dst mod_nw_src mod_nw_dst mod_nw_tos mod_tp_src mod_tp_dst
1(sw1-port1): addr:fe:2f:14:90:d7:c9 config: 0 state: 0 current: 10GB-FD COPPER speed: 10000 Mbps now, 0 Mbps max 2(sw1-port2): addr:ca:a4:43:30:6a:06 config: 0 state: 0 current: 10GB-FD COPPER speed: 10000 Mbps now, 0 Mbps max LOCAL(sw1): addr:f6:62:82:cc:b5:49 config: PORT_DOWN state: LINK_DOWN speed: 0 Mbps now, 0 Mbps max OFPT_GET_CONFIG_REPLY (xid=0x4): frags=normal miss_send_len=0 -
check that hosts (network namespaces) have network interfaces configured and UP:
ubuntu@box-1 ~$
sudo ip netns exec h1 ifconfig h1-eth1 Link encap:Ethernet HWaddr 7e:be:1f:55:e7:fbinet addr:10.0.0.1 Bcast:10.0.0.255 Mask:255.255.255.0 inet6 addr: fe80::7cbe:1fff:fe55:e7fb/64 Scope:LinkUP BROADCAST RUNNING MULTICAST MTU:1500 Metric:1RX packets:41 errors:0 dropped:0 overruns:0 frame:0TX packets:33 errors:0 dropped:0 overruns:0 carrier:0 collisions:0 txqueuelen:1000 RX bytes:3410 (3.4 KB) TX bytes:2762 (2.7 KB)
Capture Traffic
As I like to say, this environment is the "
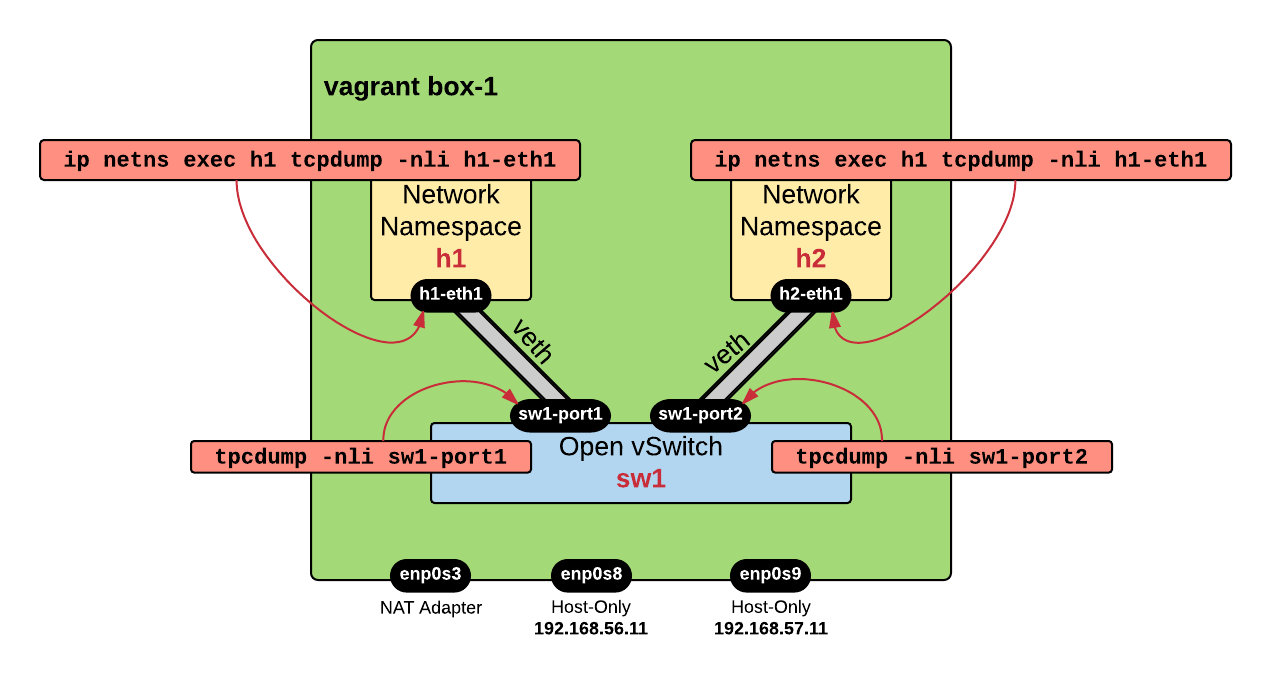
You may need to open multiple windows - in the first window you leave a continuous ping running on h1 (sudo ip netns exec h1 ping 10.0.0.2) and in the other windows you perform packet capture. You should see traffic leaving h-eth1, reaching sw1-port1, then outgoing on sw1-port2 and finally reaching h2-eth1.
Here is an example of capture performed on sw1-port1:
ubuntu@box-1 ~$sudo tcpdump -nli sw1-port1 tcpdump: verbose output suppressed, use -v or -vv for full protocol decode listening on sw1-port1, link-type EN10MB (Ethernet), capture size 262144 bytes 04:40:00.861168ARP, Request who-has 10.0.0.2 tell 10.0.0.1, length 28 04:40:00.861411ARP, Reply 10.0.0.2 is-at 4a:a6:8d:0b:27:d3, length 28 04:40:00.861417 IP 10.0.0.1 > 10.0.0.2:ICMP echo request , id 2551, seq 1, length 64 04:40:00.861512 IP 10.0.0.2 > 10.0.0.1:ICMP echo reply , id 2551, seq 1, length 64
/etc/rc.local The OVS sw1 configuration will survive the reboot since it is stored in the OVSDB server !
Now you are ready to start some SDN labs. I'll post them soon.
 Costi is a network and security engineer with over 10 years of experience in multi-vendor environments. He holds a CCIE Routing and Switching certification and is currently pursuing same expert-level certifications in other areas. He believes that the best way to learn and understand networking topics is to challenge yourself to fix different problems, production-wise or lab-type exams. He also enjoys teaching networking and security technologies, whevever there is an opportunity for it.
Comments
comments powered by Disqus