Welcome back to a new article about SDN - this time introducing an OpenFlow controller called Faucet, developed as a RYU application by New Zeeland Research and Education (REANNZ), Waikato University and Victoria University. In this article, I am not going to write about Faucet's architecture and features since you can read about it on its github page and here or here. Instead, I will describe the setup used for a demo presented at the Irish Network Operators Group 11th meetup (iNOG::B).
Let me start by saying that, unfortunately, the SDN term has lately become more of a buzz word especially due to the all the presentations and campaigns that incorrectly use (in my opinion) the word SDN, prepared by vendors that try to show off their products but that are mostly oriented onto orchestration and automation.
Yes, I had this debate with a lot of people -
What is the target of this demo ?
The purpose of this demo/article is to present few things that could be achieved with an OpenFlow controller such as Faucet:
- a quick introduction of Faucet
- use Faucet to manage both physical and a virtual switches to achieve a common goal
- leverage Linux to offload different network functions to virtual linux containers (NFV)
- use OpenFlow as the southbound protocol (especially its 1.3 version multi-table support)
- demonstrate some of Faucet’s features such as PBR, ACLs and Port Mirroring
Note that I intend to have separate articles about Faucet's multi-table architecture and other features!
Quick Faucet Overview
Faucet is an open source OpenFlow 1.3 controller, based on RYU framework (so written in Python), with features such as:
- switching: VLANs, MAC learning, ACLs, configurable flooding modes
- routing: BGP, static routing, ACLs
- other: port mirroring, PBR, monitoring & statistics (with Gauge)
You can get full list of features here - note that new features are constantly added!
As with any good piece of software, Faucet follows Python style guides (PEP8) and contains a comprehensive list of tests that could run against both physical and virtual network topologies.
There are already several vendors that support it - Allied Telesis, NoviFlow, HP Enterprise/Aruba, Zodiac FX - and, of course, you can test it with software switches such as Open vSwitch or Lagopus.
Demo Overview
This setup was created for a demo presented at the Irish Network Operators Group 11th meetup (iNOG::B).
Devices Used
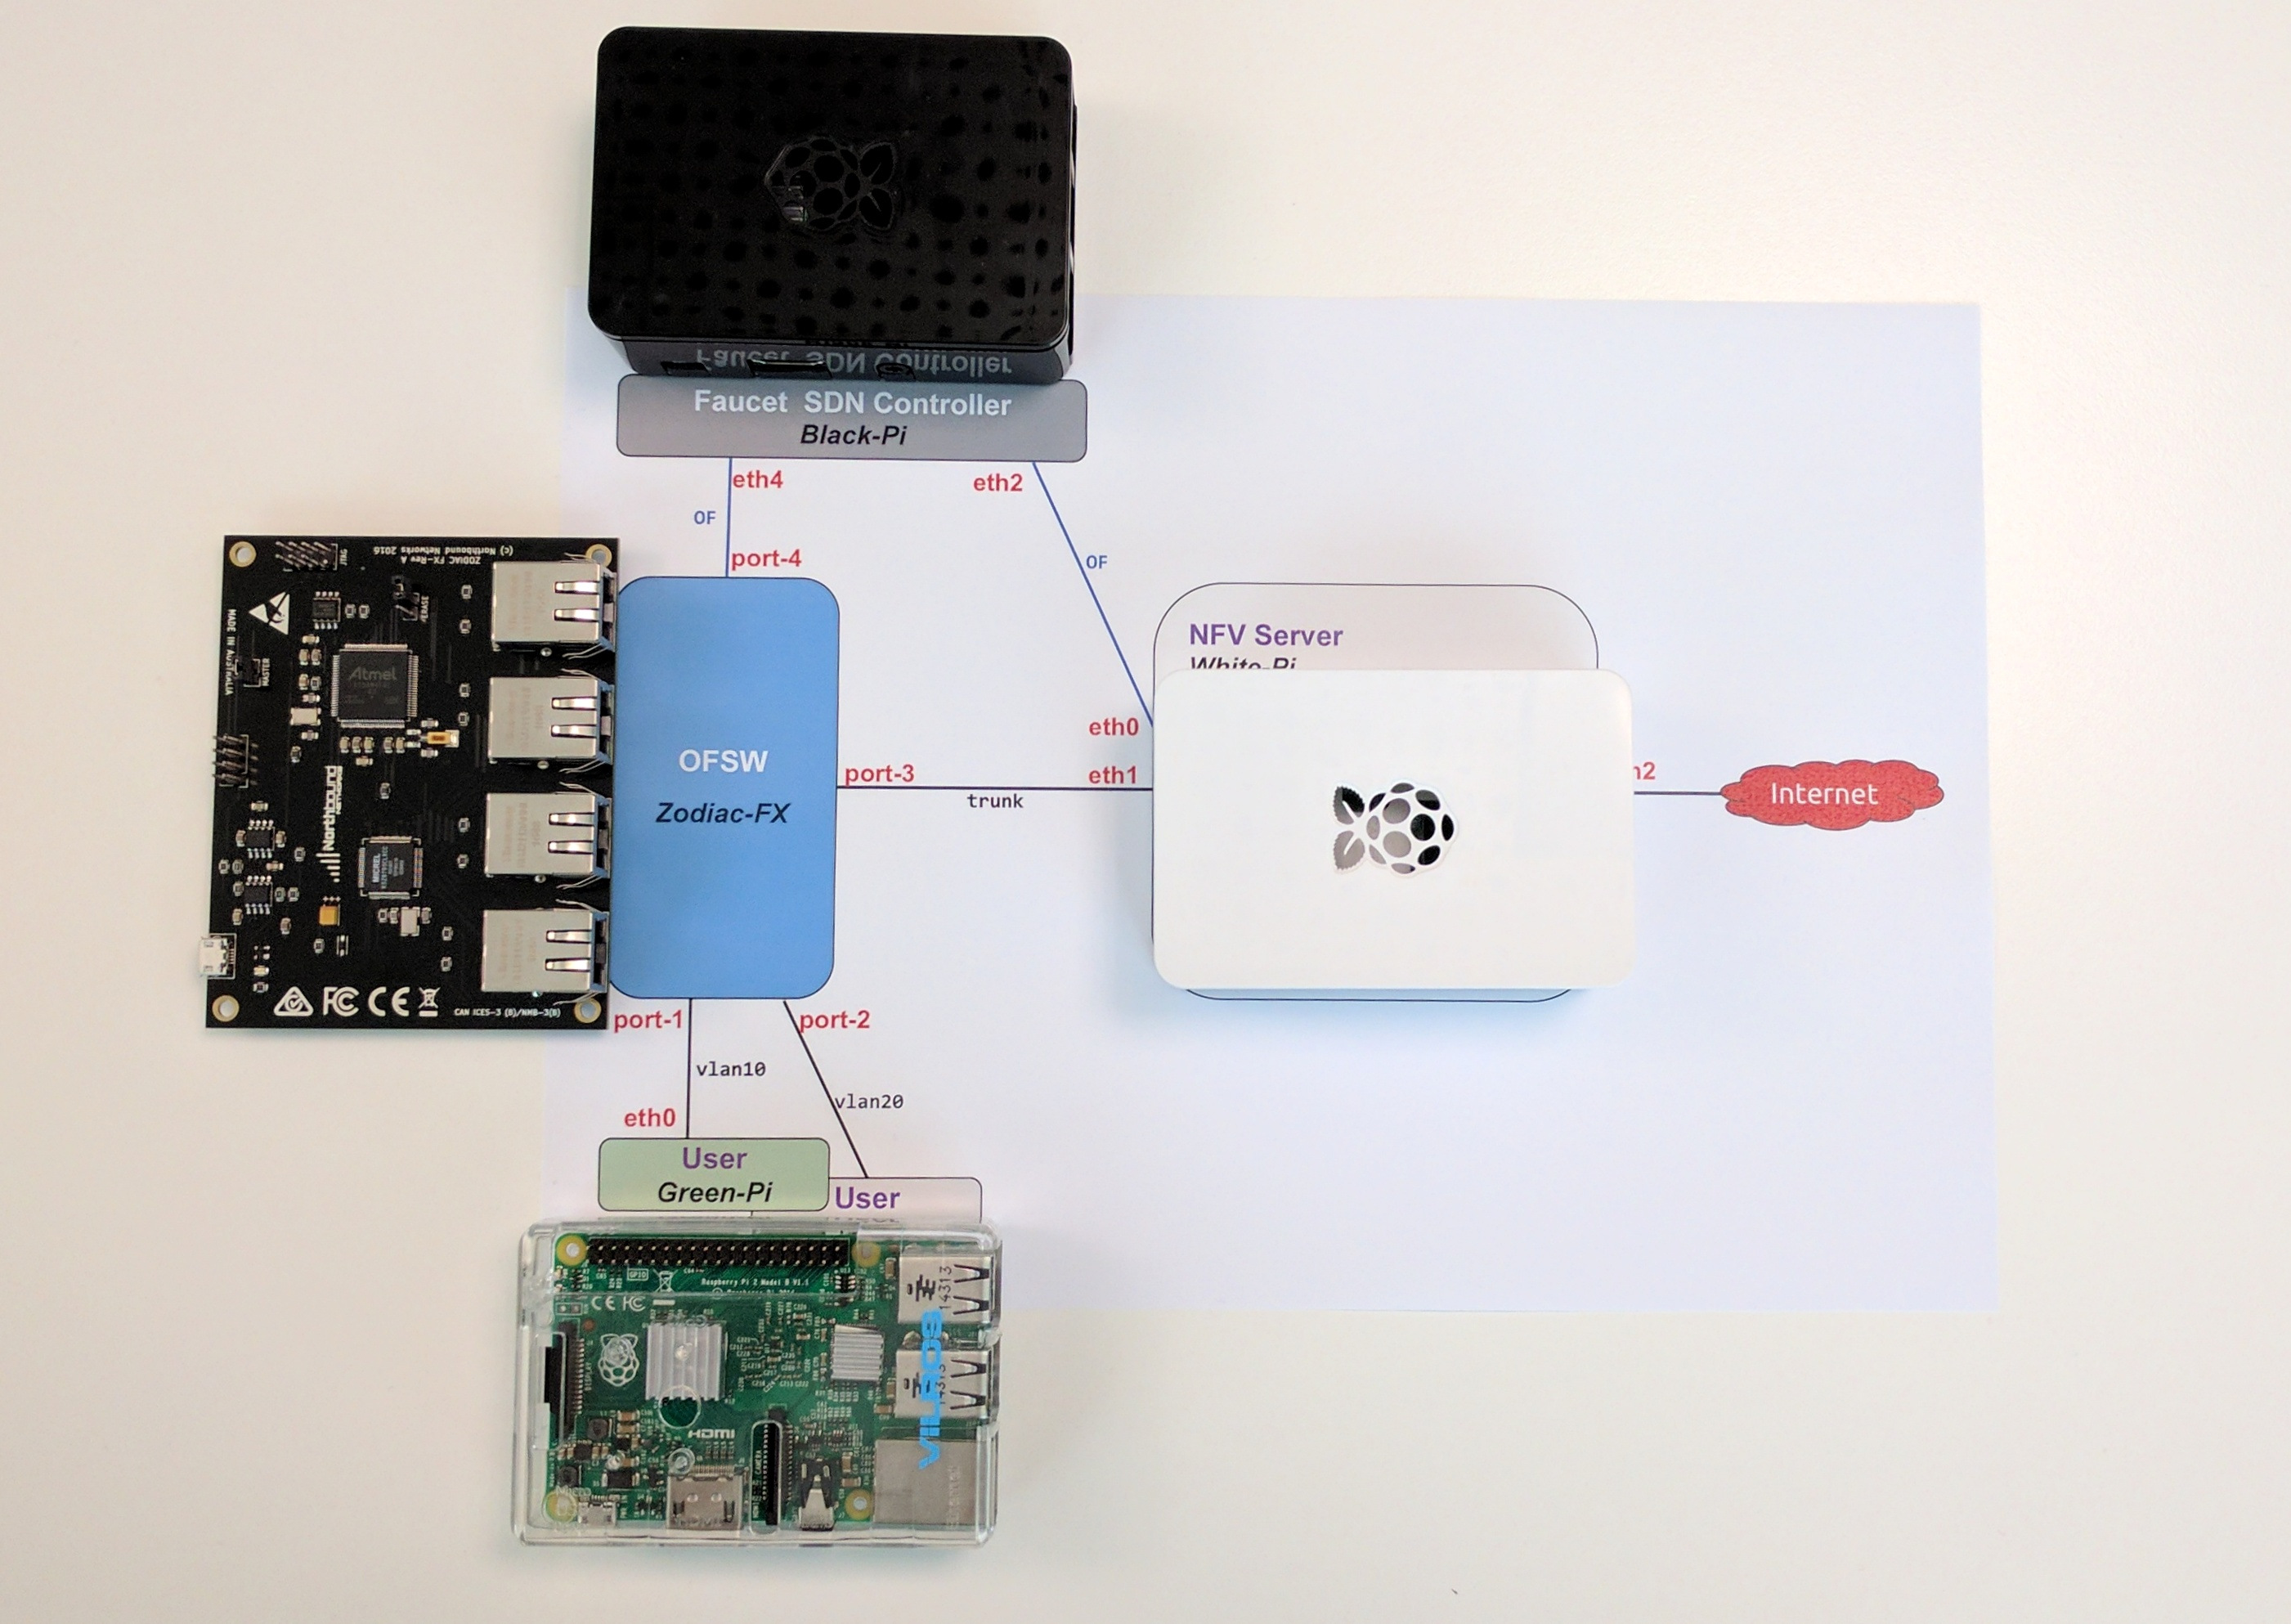
For this demo I have prepared the following devices:
- a Raspberry Pi (in black case) that will run the Faucet controller
- a Raspberry Pi (in white case) that will perform the Network Functions in Linux kernel (NFV)
- a Raspberry Pi (in transparent case) that acts as a test user
- a Zodiac FX (card-size) switch - the worlds smallest OpenFlow switch
|
NOTE
|
I am aware that you may not have these devices, but don't worry! Scroll down to the Virtualize Everything section that shows you how to use Mininet to create the same topology on an Ubuntu virtual machine and test the same setup without any extra device! Yay ☺ ! |
Topology
The final topology of the setup looks like this:
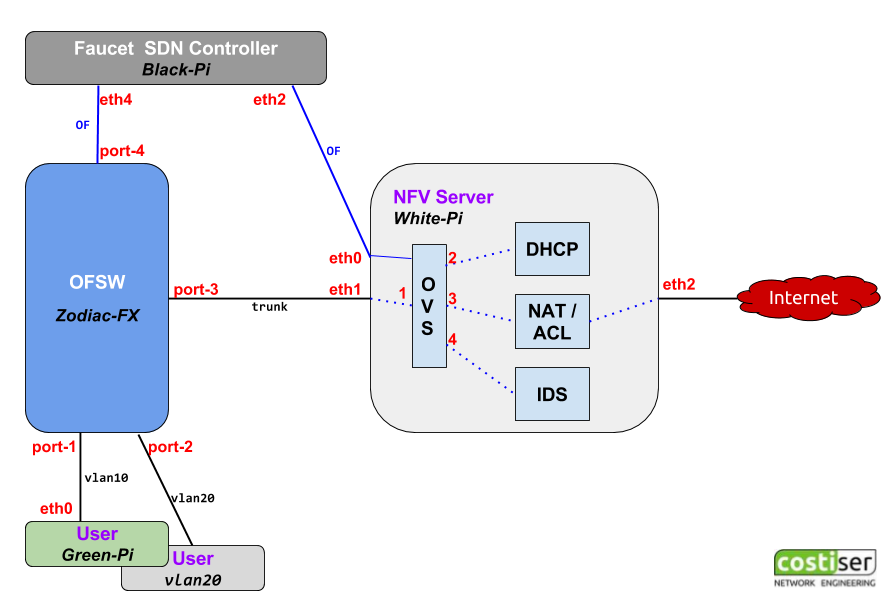
The target is to achieve the following:
- users (in the bottom of the diagram) are connected to first 2 ports on the Zodiac FX switch
Zodiac FX switch (blue box in the diagram) trunks all the user traffic on to port 3 towards the NFV server- the NFV server (light gray box) is just a Linux box that performs different network functions (read below)
- the Faucet controller (dark gray box) runs on a separate Linux machine and controls both the physical Zodiac switch and the software Open vSwitch inside the NFV
NFV Details
Probably the most complex element of this demo is the implementation of the NFV. The target is to perform the following Network Functions each inside its own isolated container:
- run a
DHCP daemon to serve IP addresses to the users (usednsmasq) - run a
NAT function to allow internal users to connect outside (useiptables) - run an
IDS server that monitors all the traffic (use Faucet's feature for port mirroring)
All of these functions run inside network namespaces that provides isolation between them. The connectivity is achieved by creating an OVS switch that is also managed by the external Faucet controller. It is clear that by doing this you have a central location for controlling both physical and logical switches and thus making sure that all of them adhere to the same network and/or security policies.
In order to connect the namespaces to the OVS software switch, we use Virtual Ethernet pipes (veth).
Physical interface eth2, that connects to the outside world, is moved into the NAT NFV in order to provide Internet connectivity to the test users. (Note that during demo I may have used the wireless wlan0 to provide internet access to the setup!)
Implementation Details
The Raspberry Pi's used for this demo run Ubuntu Mate. The main reason I opted for Ubuntu Mate versus Raspbian is the predictable interface naming, which was an important factor considering that I used a lot of USB adaptors to get more network connections on the Pi's. Make sure you run sudo apt-get update; sudo apt-get upgrade before installing further packages.
Faucet
The procedure to install Faucet - the dark gray box in the diagram or the black case Raspberry Pi in the picture - is very very simple:
# Packages needed sudo apt-get install python python-pip sudo pip install --upgrade pip# Faucet installation sudo pip install ryu-faucet
Small preparation and you are good to go:
# Create the logging directory for faucet sudo mkdir -p /var/log/ryu/faucet/# Provide Faucet a basic configuration (yaml file) to start with cd /etc/ryu/faucet sudo cp faucet.yaml-dist faucet.yaml
Use pip show ryu-faucet to see the Faucet's location and then invoke ryu-manager (remember, Faucet is a Ryu Application):
sudo ryu-manager --verbose /usr/local/lib/python2.7/dist-packages/ryu_faucet/org/onfsdn/faucet/faucet.py
...
...
  CONSUMES EventOFPEchoRequest
  CONSUMES EventOFPPortDescStatsReply
EVENT Faucet->Faucet EventFaucetResolveGateways
EVENT Faucet->Faucet EventFaucetHostExpire
EVENT Faucet->Faucet EventFaucetResolveGateways
EVENT Faucet->Faucet EventFaucetResolveGateways
...
<CTRL & C>
Additionally (optional but you may want to do this), you can follow these instructions to install Faucet as a service.
Now that we have Faucet working, let's adjust its configuration file /etc/ryu/faucet/faucet.yaml for this setup:
version: 2vlans: 10: name: "lab-10" unicast_flood: True max_hosts: 33 20: name: "lab-20" unicast_flood: False 999: name: "IDS" unicast_flood: Falseacls: 99: - rule: dl_type: 0x800 nw_proto: 17 tp_src: 68 tp_dst: 67 actions: allow: 1 output: port: 2 - rule: actions: allow: 1 mirror: 4 98: - rule: actions: allow: 1 mirror: 4dps: zodiac-sw:dp_id: 0x011111 hardware: "ZodiacFX" interfaces: 1: native_vlan: 10 2: native_vlan: 10 3: native_vlan: 10 ovs-sw:dp_id: 0x01 hardware: "Open vSwitch" interfaces: 1: native_vlan: 10 acl_in: 99 2: native_vlan: 10 3: native_vlan: 10 acl_in: 98 4: native_vlan: 999
Note that dp_id needs to be adjusted to match your Zodiac's DPID.
As you can see above, ACL 99 catches all DHCP traffic and sends it towards DHCP NFV (first rule) and then it does port-mirroring by sending a copy of all traffic seen on the port it is applied to the IDS on port 4. Same for ACL 98, it mirros return traffic from the internet onto IDS port-4.
Packet walk
Here is a brief description of how the traffic should work:
- Users are connected to ports 1 and 2 on the Zodiac FX switch
- As per rule defined in Faucet's configuration file, all DHCP traffic from hosts is forwarded on toward the DHCP NFV (this is
PBR implementation ). DHCP provides an IP address and default gateway (10.0.0.1) that exists on the NAT NFV internal interface - After DHCP is successful, traffic gets forwarded by the Zodiac FX and the OVS switch
based on flows installed by Faucet (its multi-table architecture is described here and here) - NAT NFV has forwarding enabled and uses
iptablesto masquerade internal traffic from users behind the IP used on the link that connects to the outside world - The Faucet's configuration also contains a port mirroring rule (which is translated by Faucet into an OpenFlow rule or flow) that sends a copy all traffic seen on OVS ports 1 and 3 to the port 4 where IDS is connected.
NFV
As already mentioned above, each distinct network function will run inside a network namespace. This article may give you more information about namespaces and veth interfaces and how to set them up. For this demo you don't have to do any of that because I made a bash script that creates all the namespaces, the veth interfaces and the connectivity between them:
#!/bin/bash#set -x echo "[info] Cleanup everything..." ip netns | xargs -r -t -n 1 ip netns del ip link | egrep -o "[dhcpnatids]{3,4}-eth[01]" | xargs -r -t -n 1 ip link delecho "[info] Delete existing OVS bridge..." ovs-vsctl del-br ovs-sw sleep 2echo "" echo "[info] Adding network namespaces..." ip netns add dhcp-ns ip netns add nat-ns ip netns add ids-nsecho "[info] Creating virtual ethernet interfaces..." ip link add name dhcp-eth0 type veth peer name dhcp-eth1 ip link add name nat-eth0 type veth peer name nat-eth1 ip link add name ids-eth0 type veth peer name ids-eth1echo "[info] Adding veth to network namespaces..." ip link set dev dhcp-eth0 netns dhcp-ns ip link set dev nat-eth0 netns nat-ns ip link set dev ids-eth0 netns ids-nsecho "[info] Set interfaces up in the root namespace..." ifconfig dhcp-eth1 0 up ifconfig nat-eth1 0 up ifconfig ids-eth1 0 upecho "[info] Set interfaces up and assign IP in the NFVs..." ip netns exec dhcp-ns /sbin/ifconfig dhcp-eth0 10.0.0.254/24 up ip netns exec nat-ns /sbin/ifconfig nat-eth0 10.0.0.1/24 up ip netns exec ids-ns /sbin/ifconfig ids-eth0 0 up ip netns exec dhcp-ns /sbin/ip addr add 1234::ff/64 dev dhcp-eth0 ip netns exec nat-ns /sbin/ip addr add 1234::1/64 dev nat-eth0 ip netns exec nat-ns /sbin/ip addr add 1111::1/64 dev lo:1 ip netns exec nat-ns /sbin/ip addr add 1.1.1.1/64 dev lo:1echo "[info] Add a new OVS switch and ports..." ovs-vsctl add-br ovs-sw ovs-vsctl add-port ovs-sw eth1 -- set Interface eth1 ofport_request=1 ovs-vsctl add-port ovs-sw dhcp-eth1 -- set Interface dhcp-eth1 ofport_request=2 ovs-vsctl add-port ovs-sw nat-eth1 -- set Interface nat-eth1 ofport_request=3 ovs-vsctl add-port ovs-sw ids-eth1 -- set Interface ids-eth1 ofport_request=4 ip link set eth1 upecho "[info] Add Faucet as controller for the OVS switch..." ovs-vsctl set-controller ovs-sw tcp:192.168.124.10:6633echo "[info] Add WAN link to the NAT NFV..." ifdown eth2 ip link set dev eth2 netns nat-ns# [TODO] change to manual dhcp client instead of relying on ifup scripts ip netns exec nat-ns /sbin/ifup eth2echo "[info] Start dnsmasq (DHCP server) in DHCP NFV..." ip netns exec dhcp-ns /usr/sbin/dnsmasqecho "[info] Enable NAT MASQUERADE in NAT NFV..." ip netns exec nat-ns /sbin/iptables -t nat -A POSTROUTING -o eth2 -j MASQUERADEecho "[info] Enable forwarding in NAT NFV..." ip netns exec nat-ns /sbin/sysctl -q -w net.ipv4.ip_forward=1# [TODO] to be enabled when NAT66 works # ip netns exec nat-ns sysctl -q -w net.ipv6.conf.all.forwarding=1
As you see in the above script, I rely on ifup/ifdown scripts to configure some of the interfaces. For this to work, I have configured the /etc/network/interfaces file like this:
source-directory /etc/network/interfaces.d auto lo iface lo inet loopback# Builtin Ethernet port # OpenFlow connection # controller on 192.168.124.10 auto eth0 iface eth0 inet static address 192.168.124.124 netmask 255.255.255.0# Top-Left USB # DataPlane connection # added to the OVS (no config needed) #iface eth1 inet manual auto eth1 iface eth1 inet static address 0.0.0.0# Bottom-Left USB # WAN/Internet (Outside link) # [TODO] Do DHCP inside network namespace auto eth2 iface eth2 inet static address 0.0.0.0 #iface eth2 inet dhcp# Top-Right USB # OOB management auto eth3 iface eth3 inet static address 192.168.1.3 netmask 255.255.255.0
On the DHCP NFV, I run dnsmasq as a dhcp/dns server (sudo apt-get install dnsmasq to install it) and below is the basic configuration (file /etc/dnsmasq.conf):
domain-needed
bogus-priv
no-resolv
server=8.8.8.8
local=/lab/
interface=dhcp-eth0
except-interface=lo
bind-interfaces
domain=lab
dhcp-range=10.0.0.10,10.0.0.199,255.255.255.0,6h
dhcp-range=1234::100, 1234::1ff, 64, 6h
dhcp-option=option:router,10.0.0.1
dhcp-option=6,8.8.8.8,8.8.4.4
dhcp-option=option6:dns-server,[2001:4860:4860::8888],[2001:4860:4860::8844]
cache-size=2048
log-queries
log-dhcp
log-facility=/var/log/dnsmasq.log
log-async
Putting it all together
At this moment, connecting everything as per the diagram above should allow the test user to get an IPv4 address (with default gateway and dns server information) and to connect to the internet.
Some troubleshooting is expected so jump to the end of this article to see how you can verify your setup.
Virtualize Everything
Not everybody has the devices needed for this setup... but you can create everything on a Linux box using namespaces, veth, OVS, etc. Or you can use Mininet that does all this for you. Follow the procedure below - it should take you less than one hour to have everything working.
|
NOTE
|
Note that creating the entire network/setup in a virtualized environment gives administrators the possibility to test the OpenFlow rules installed by Faucet and to validate end-to-end connectivity before launching them in the production environment. This is what software engineers call Push On Green! |
1. Prepare a Vagrant Box
In order to be consistent (and avoid problems due to differences between package versions, etc), I suggest you create a vagrant box running Ubuntu 16.04 (details were already provided in a previous post) then make sure that you update your new virtual box.
-
on your laptop/desktop, prepare Vagrant (it assumes that you have VirtualBox installed):
mkdir -p ~/vagrantwork/box1; cd ~/vagrantwork/box1
# Boot your new box up cat >Vagrantfile <<EOF Vagrant.configure(2) do |config| config.vm.box = "ubuntu/xenial64" config.vm.box_check_update = false config.vm.network "private_network", ip: "192.168.56.11 " #config.vm.network "public_network", bridge: "en0: Wi-Fi (AirPort)", auto_config: false config.vm.network "public_network", bridge: "en5: Thunderbolt Ethernet", auto_config: false config.vm.provider "virtualbox" do |vb| #vb.gui = true vb.name = "vagrant_box1 " end config.ssh.forward_x11 = true end EOF# Boot your new box up vagrant up# Connect to it vagrant ssh -
on your new Ubuntu vagrant box:
sudo apt-get update
sudo apt-get upgrade
2. Install the necessary packages
sudo apt-get install python mininet python-pip dnsmasq
sudo apt-get install python-pip
sudo pip install --upgrade pip
sudo pip install ryu-faucet
3. Faucet configuration
To make Faucet work you need to create the location for the logs sudo mkdir -p /var/log/ryu/faucet/ and then create its config file vi /etc/ryu/faucet/faucet.yaml - copy/paste the configuration presented in the Faucet section above.
You have the option of running it from command line or create the necessary scripts to make it run as a service (instructions here).
4. dnsmasq configuration
dnsmasq should already be installed (as part of step 2) so you only have to adjust its config file /etc/dnsmasq.conf to match the demo (see NFV Section above)
5. Mininet topology
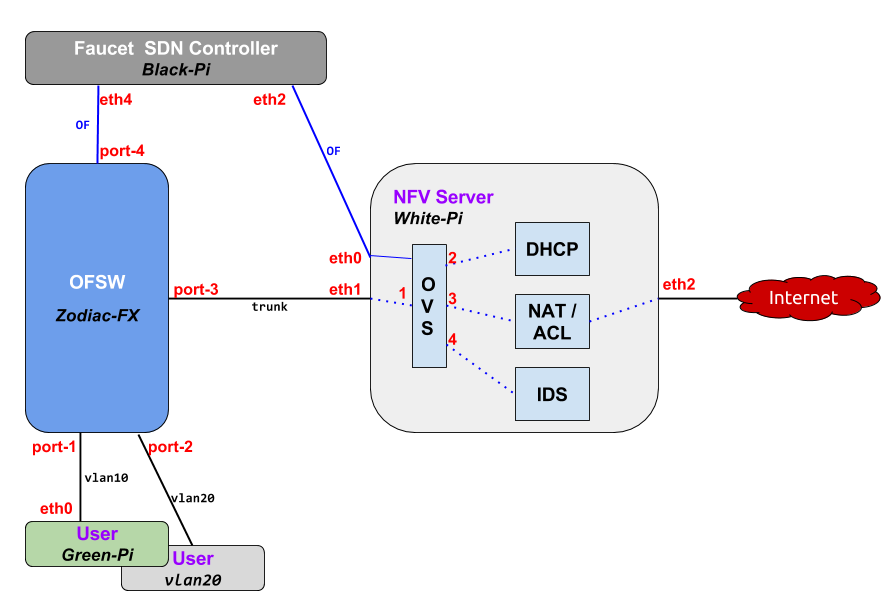
Last step is to run a Mininet topology that creates all the devices as per the diagram shown at the top of this article. I already prepared this mininet file and shared it via github:
git clone https://github.com/costiser/faucet.git
cd faucet/inog-demo
Additionally, I am copying Mininet's m utility from here but I change the penultimate line to this:
cmd="exec sudo TERM=xterm-color debian_chroot=$host mnexec $cg -a $pid $cmd"
So you should have these files in the same folder - you must run all these commands with
costiser@costi ~/faucet/inog-demo$ ls -l
total 32
-rwxr-xr-x  1 costi  costi   429 Mar  6 18:06 cleanup.sh
-rwxr-xr-x  1 costi  costi     2 Mar  7 14:14 m
-rwxr-xr-x  1 costi  costi  5582 Mar  6 18:07 mininet_faucet_demo.py
cleanup.shis an additional bash script that cleans your setup for potential Mininet leftovers or namespaces/links that were not cleaned upon exiting. Run this script to make sure you start clean.mis Mininet's utility that I use to connect to Mininet hosts from external terminalsmininet_faucet_demo.pyis the topology file that I created to start the virtual network
To run the setup use sudo ./mininet_faucet_demo.py
Then you use m utility to connect to Mininet nodes in order to run troubleshooting commands inside each node:
ubuntu@xenial ~/faucet$sudo ./m nat (nat) root@xenial:~/faucet#(nat) root@xenial:~/faucet#
Troubleshooting
This section is common to both physical setup (using the Zodiac FX switch) and to the virtualized setup (where all devices are emulated with Mininet). Troubleshooting is the most important part as it will help you understand better how all things work together. Since this article is already too long, I'm only listing the commands used to troubleshoot with the promise that I will explain each of them in a future article.
tcpdumpon the incoming port eth1 on the NFV server should display all traffic (DHCP, internet connectivity, etc)tcpdumpon the dhcp-eth0 interface,inside the DHCP NFV should display all incoming DHCP Requests from the test users and outgoing DHCP Replies from the server/var/log/dnsmasq.logon the DHCP NFV should show all the leases assignediptables -nvL -t naton the NAT NFV should display the MASQUARADE ruleconntrack -Lon the NAT NFV should display the connection table (where you see the NAT entries)tcpdumpon the IDS NFV should display all the traffic traversing the OVS switch between ports 1 and 3, in both directions/var/log/ryu/faucet/faucet.logshould display that Zodiac FX and the OVS switches successfully talk to Faucet controller
As always, thank you for your interest and comments! Good luck with your setup!
 Costi is a network and security engineer with over 10 years of experience in multi-vendor environments. He holds a CCIE Routing and Switching certification and is currently pursuing same expert-level certifications in other areas. He believes that the best way to learn and understand networking topics is to challenge yourself to fix different problems, production-wise or lab-type exams. He also enjoys teaching networking and security technologies, whevever there is an opportunity for it.
Comments
comments powered by Disqus